The Board Add-in for Microsoft Excel allows to access data stored in a Board database from MS-Excel through the configuration of the Board Layout object.
The Board Layouts retrieve data from the Board database to a worksheet and can be refreshed by the user. With the Board Add-in for MS-Office, it becomes simple and easy to keep your MS-Office documents updated and synchronized with the data of a Board database..
Note that the Layout object supports write-back from Excel to Board so it creates a dynamic bidirectional link to Board cubes,
read from Board: data is extracted from the Board database and retrieved to an Excel worksheet,
write-back to Board: the user can input/modify the extracted data in Excel and save it back to Board database (provided the user has appropriate privileges to modify the Board cubes)..
Board Excel Add-In version 7.3 supports
Microsoft Office 2007
Microsoft Office 2010, 32-bit and 64-bit editions
Microsoft Office 2013, 32-bit and 64-bit editions.
Note
The Board Add-ins for MS-Office can't be installed on MS-Office 2003, MS-Office XP. The Microsoft Office editions for Macintosh are not supported either.
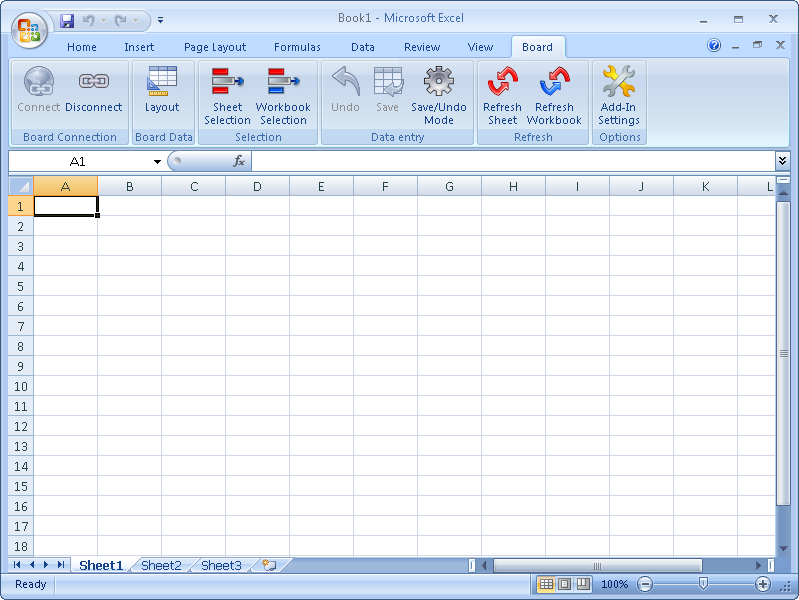
After having installed the Board Excel Add-in, open Microsoft Excel. The following picture shows Microsoft Excel 2007 with the Board Excel Add-In tab.

A Board tab with features and functions to add and configure Board Layouts is added along side the other standard tabs of Excel. In the following paragraphs, the features of the Board add-in are explained.
Note
Settings done through a feature accessible from the ribbon bar influence all Layouts present on the active worksheet.
In the above picture we can see the Board Ribbon, it is divided into six sections each allowing to configure or set a set of features.
The sections are (from left to right):
Board Connection: allows to connect to a Board Server or disconnect from the Board Server.
Board Data: creates or modifies a Board Layout to retrieve data from (or write-back to) a Board database.
Selection: allows to set or modify the Selection criteria for the Layouts present on the active worksheet or whole workbook.
Data Entry: allows to set the data-entry mode (immediate save or deferred) for the current Board Layout (applicable only if the Layout has one or more data-entry blocks.
Refresh: re-runs all Layouts present on the active worksheet or for the whole workbook.
Options: allows to configure the settings for connecting to a Board Server as well as setting other options for the Board add-in.
The context menu is accessed by right-clicking on the cells of a Layout (any cell of the report except the first column). The Board features are found at the bottom of the Microsoft context menu.
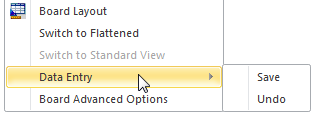
The features and options accessible from the context menu are:
Board Layout: opens the Board Layout definition.
Switch to Flattened / Standard View : toggles between the flattened and grouped representation of data (applicable only on reports having two or more entities by row).
Data Entry: Applicable to Layouts with data-entry, it allows to save the changes to the database (write-back data to the Board cubes) or undo the changes and revert to the last saved values. Note that once data has been saved to the Board database, it is no longer possible to undo the changes.
Board Advanced Options: provides access to other configuration options for the selected Layout.
Click the connect icon to connect to a Board Server. The first step to start working with the Board Add-in for Excel is to connect to a Board Server and log-on. The connection to the Board Server is as in the Board Client. Refer to the page Board Client Options for details on how to configure the connection parameters in case it hasn't been configured by the Board administrator.
When the connection is established, the icon changes and allows disconnecting from the server.
Allows to create or modify a Board Layout on the current worksheet. It is possible to define one or more Layouts on an Excel worksheet.
To add a Layout, position the cursor on an empty cell where you want the resulting data to be inserted and click the Layout icon of the Board Ribbon. The standard Board Layout window will open. Refer to the section of the manual Layout for instructions on how to configure a report. Remember to start by selecting the desired Board database from the drop-down list on the top right corner of the Layout window.
The data returned by executing the Layout will be inserted on the sheet starting from the position of the cells cursor, down and to its right. If there are not sufficient empty rows and columns under and to the right of the cursor to paste the Board data, an error message is displayed, indicating the number of missing rows or columns required.
Note
Note that the data returned by a Board Layout is automatically given a name, the named range can then be used in Excel formulas supporting cell ranges.
To modify an existing Layout, click on a cell of the report then click on the Layout icon of the Ribbon bar or right-click to open the context menu and select the Layout menu option. Modify the Layout as desired (refer to Layout for details) ten press the OK button to run it.
If there are not sufficient empty rows and columns to paste the data returned by the Layout, an error message is displayed, indicating the number of missing rows or columns.
The Board Excel Add-In allows to set a Select three distinct selections
Workbook Selection: applies to all Layouts on all sheets, unless a sheet selection is defined.
Sheet Selection : applies to the Layouts present on the active sheet. This selection prevails over the workbook selection, replacing it. It is not nested within the workbook selection, when a sheet selection is defined, the workbook selection is ignored.
Layout selection: applies to the individual Layout where it is defined and it is nested within the sheet selection if one exists or the workbook selection if it exists.
For details on the use of the Selection function, refer to What is the Select function and the subsequent pages.
The Board Excel Add-In supports data entry to the Board cubes. In order to be able to enter data, a Layout must be configured accordingly, refer to the section of the manual Data Entry
for details.
After a Layout with data entry has been configured, the Board Excel Add-In offers three methods of entering data:
immediate Data Entry
Asynchronous Save/Undo mode
Deferred Data Entry (off-line).
This mode is the default configuration, it immediately saves data back to the Board database as the user modifies a cell value and presses the enter key of the keyboard. With this data entry mode, every change of a cell value in Excel is sent back to the Board Server which saves it to the cube. This mode requires the user to be connected to a Board Server.
This mode can be enabled on any Layout with data entry. To enable it, select the desired Layout then click the Save/Undo icon located in the Ribbon bar or use the context menu (right click on the cells of the data entry report).
In this mode, it is possible to modify several cells of the report and only when the user presses the Save button the data is saved back to the Board cubes.
Every cell value modified by the user but not yet saved to the Board database is highlighted in green (or different color), and by clicking the Undo icon it is possible to discard the changes and revert to the last saved values.
When the Excel sheet contains more than one data entry report, the Save button of the Ribbon bar acts on all therefore saves all modified values of all data entry reports. To save or undo the changes for a single data entry report, use the context menu (right-click on the report cells).
The Board Excel Add-in enables users having a laptop to work on their Board spreadsheets while they are off-site, not connected to the company's Board Server nor to the Internet. To be able to enter data while disconnected,
prepare the Excel file: open the Excel file when it is possible to connect to the Board Server, connect to the Board Server and refresh the Layouts clicking the icon Refresh Workbook,
then ensure that the Save/Undo mode is set on all reports having data entry (see above paragraph on how to enable Save/Undo mode),
disconnect from the Board Server (click the Disconnect icon) and save the Excel file to your local disk.
The, while off-site or not connected to any network or Internet, it is possible to open the Excel file. The Board reports will display the data as was when last refreshed.
It is possible to enter data on the Board reports supporting data entry while disconnected. The modified cells with unsaved data will be highlighted.
At a later time, when it is possible to connect again to the Board Server, open the Excel file, connect and click the Save button to save the data. If there are multiple sheets with reports with data entry, remember to save data for all of them.
The refresh function updates the Board reports contained in the Excel file, retrieving data from the Board database.
The refresh Sheet icon allows to re-execute all the Layouts present on the active worksheet.
The refresh Workbook icon allows to re-execute all the Layouts on all sheets of the Excel file.
The advanced configuration options of a Layout are accessible through the context menu (right-click on the cells of the report to open the context menu). The following picture shows the options available in this menu.
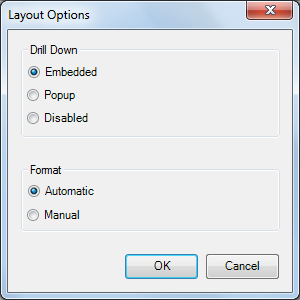
This section allows to set the behavior of the drill-down action. Drill-down is triggered by double clicking on the row header of a report.
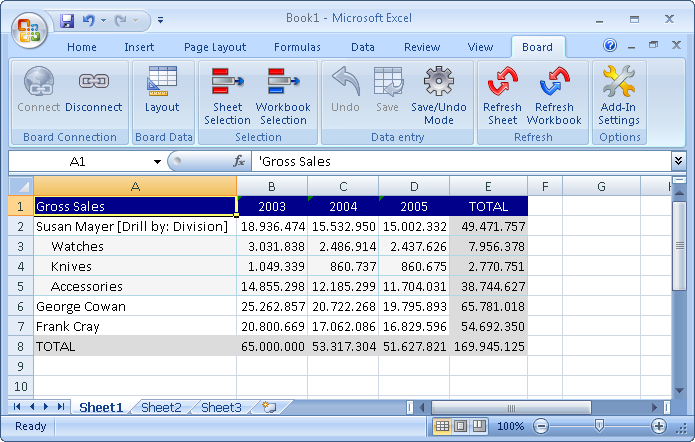
Embedded. This drill-down option displays the detail data in-line in the Excel sheet. It expands the report by adding the number of required rows as show in the following illustration. If the Excel sheet doesn't contain sufficient empty rows to expand the report without overlapping other data, then an error message is displayed. In these cases change the drill-down option to pop-up.
Pop-up. This option opens a pop-up window with the drill-down detail data, as for the BoardClient. This option is to be preferred in case the Excel sheet contains other data located under the Board report as the embedded drill-down would overlap.
Disabled. This option disables the drill-down function on the selected report.
Automatic. With this option the formatting of the Board report is automatically managed by Board. The colors and fonts of the cells are managed by Board: headers, totals, sub-totals, alerts and other format option are inherited by the Layout settings, therefore it is not possible to use Excel functions to change the fonts or colors, cell borders etc. of data as these settings are overwritten every time the report is refreshed.
Manual. When this option is enabled, Board only returns the raw data into the Excel sheet and any cell format option can be performed using the standard Excel functions. The format setting are not overwritten when the Layout is refreshed.
This icon opens the configuration panel for the Board Add-in. This configuration is normally done one time only after the first installation of the program.
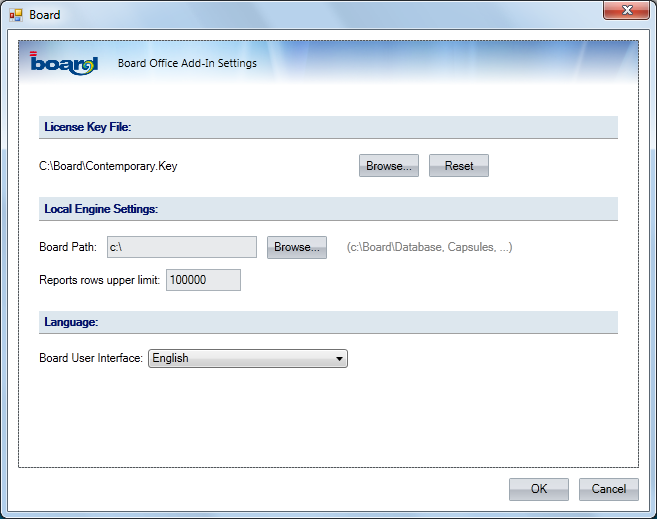
If required, select the Board license file to enable the Board engine to run locally. Only a license of type Stand-alone can be selected here. This setting can be ignored if you do not work on databases stored on the computer's local hard disk drive.
These settings can be ignored if you do not work on databases stored on the computer's local hard disk drive.
Board Path. Location of the Board directory which contains databases and capsules.
Reports row upper limit. Sets the maximum number of rows for a report. The purpose of this threshold is to avoid executing very large reports (runaway queries).
Allows to set the user interface language for the Board add-in: select the desired language from the drop-down list.
The SetSelection formula allows to apply to the worksheet containing one or more Layouts, a Select through a formula. There are two similar functions,
SetSelection() : applies the select to the worksheet. To view the result, the worksheet needs to be refreshed clicking the Refresh button from the Board Add-in toolbar.
SetSelectionWithRefresh() : applies the select to the worksheet and triggers the refresh of all Layouts present on the worksheet.
Syntax
=SetSelection("DB Name", "Entity1=Member1, Member2, Member3;Entity2=Member1,Member2");
=SetSelectionWinthRefresh("DB Name", "Entity1=Member1, Member2, Member3;Entity2=Member1,Member2");
=SetSelection("Delta", "Product=Officer, Camper;Year=2004;Area Manager=George Cowan")
=SetSelection("Delta", "Product=", M5, "Year=", M7)
Note
the list separator character depends on your regional settings, it usually is the comma or semicolon character.
The select applied by the formula can be deleted by opening the select window and applying a new select.
Note
Only one SetSelection function can be applied to a worksheet, if more formulas are present only one will be executed.