REST API call step
The REST API Procedure step is one of the steps offered in the "Execution flow" Action group in the Procedure editor. This step allows you to make an API call to other systems (or other Board Platforms) to trigger automated processes, massively send or receive data, and much more. Once the Data source connection has been configured, you can proceed to the step configuration below.
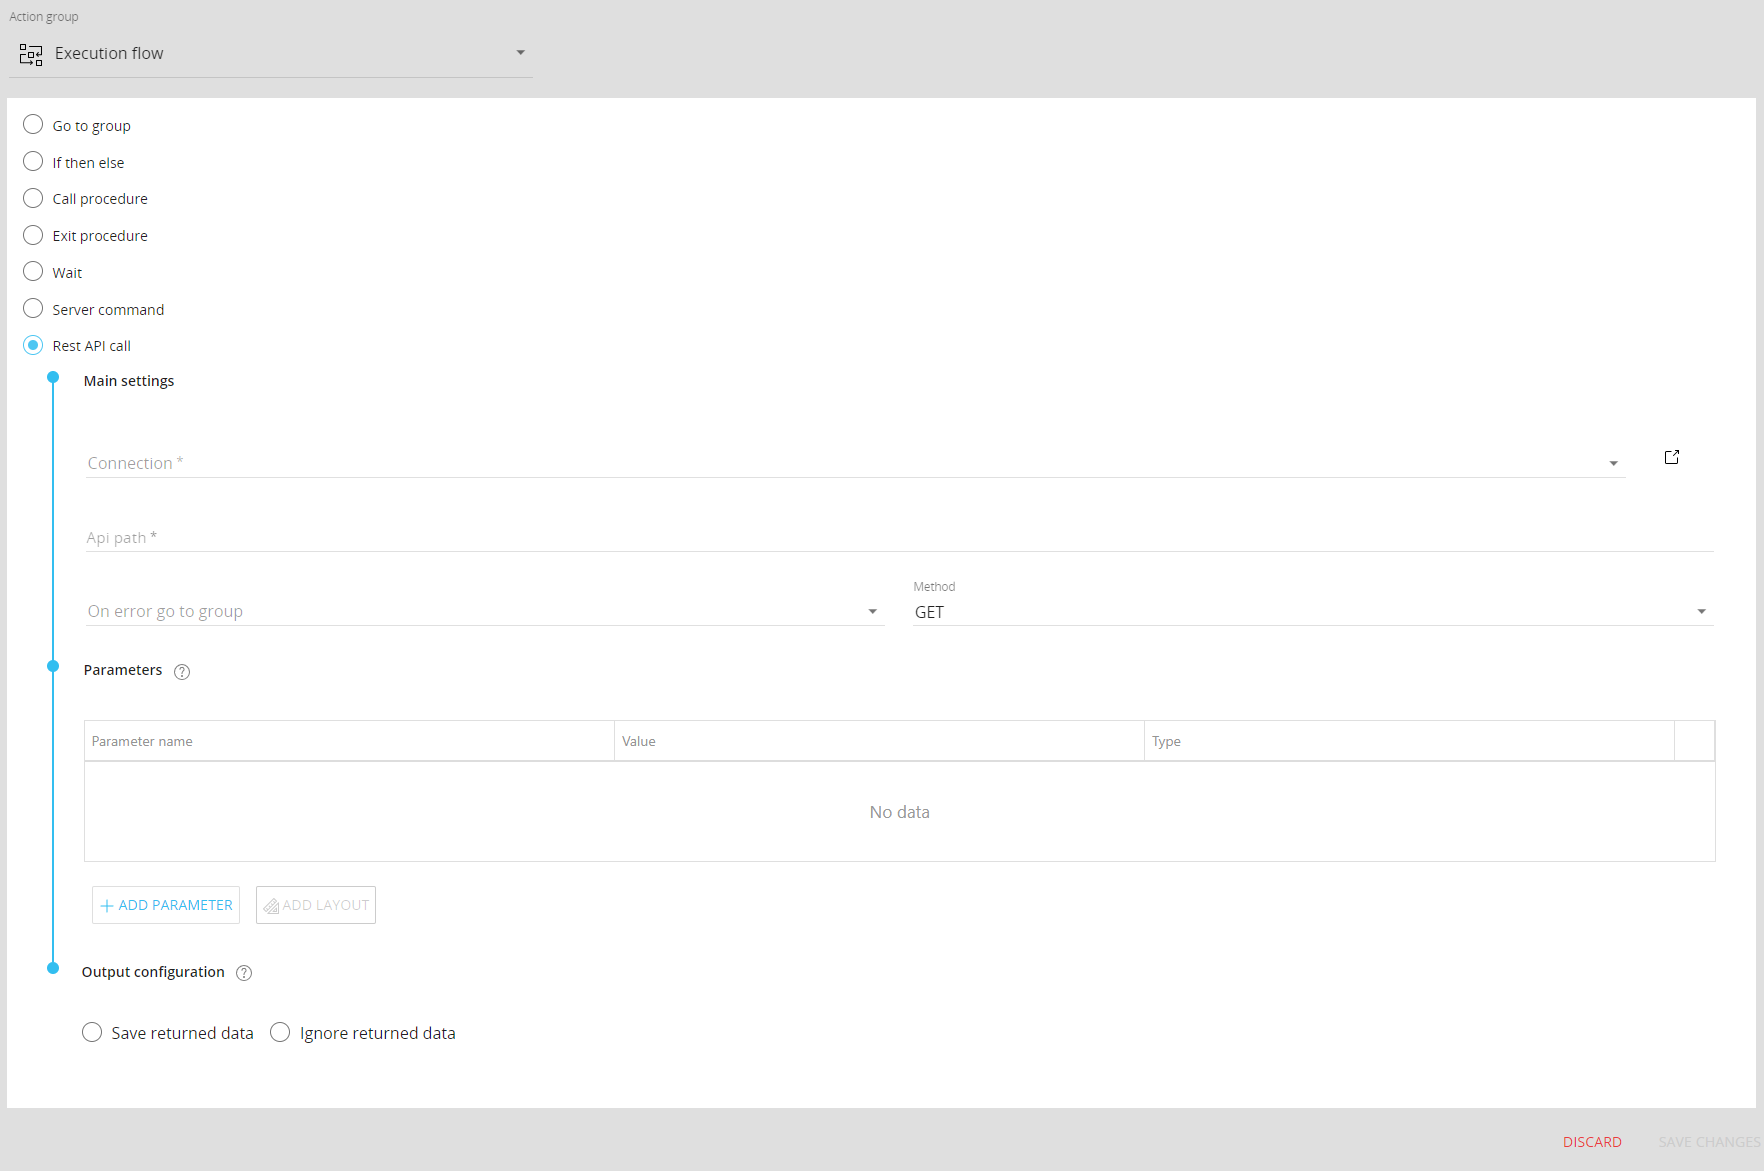
Main settings and parameters
To configure the new step, add it to the desired Procedure and proceed as follows.
Main settings
Fill the Main settings section:
- From the "Connection" dropdown menu, select the appropriate Data source connection configured as explained above
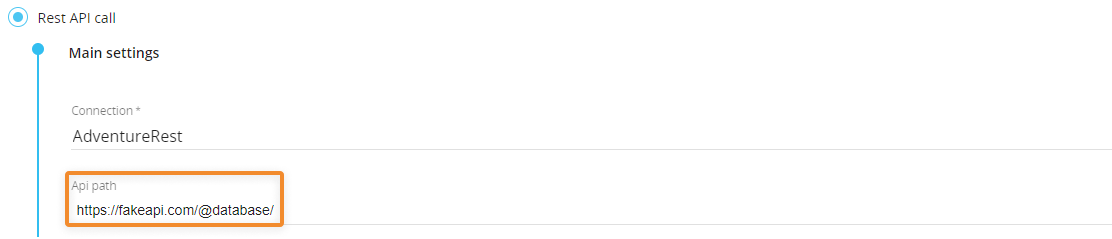
- Enter the API endpoint URL in the "Api path" field. If the chosen Data source connection includes a base URL for the API endpoint, it will automatically appear next to the "Api path" field
- (Optional) From the "On error go to group" dropdown menu, select a group of steps which the Procedure should run in case the API request returns an error status code
- Select the appropriate API method request: GET, POST, PUT, DELETE, and PATCH.
Parameters
In the Parameters section, you can add as many additional parameters you want to pass to the endpoint to receive the expected response.
To add a parameter, proceed as follows:
- Click on the "ADD PARAMETER" button to add a new row in the table
- FIll in the "Parameter name" value. The "parameter name" value is required and must be unique for the "Header" and "Body" types explained in step 4. You can also enter Substitution Formulas and Data Pickers in the "Parameter name" field of each parameter in the "Parameters" table. These elements are also evaluated at runtime.
- Fill in the "Value" field. This field supports fixed values (numbers and text strings), Data Pickers, and the following Substitution formulas:
- @datetime
- @date
- @time
- @username
- @user
- @database
- @DTB
- @selection
- @[entityname]
- @Selection_Ex,
- Only the "Limit", "Display", and "Interval" parameters are supported, and the "Layout" and "Block" parameters are not supported
- The Entity parameter is required
- The result of an @Selection_Ex resolved in the REST API call step context is similar to what happens in a Screen with the "ShowActive" parameter set to "True" (in this step, this parameter is not supported)
- The new "Separator" parameter can be used to define a custom separator string for the resulting Entity member list. If it is not defined, the comma separator will be used
- These elements are evaluated at runtime
Learn more about Substitution formulas
-
Select one of the "Type" options: Header, Body or QueryString. This value indicates the component of the API request which will pass the information to the external API
The Content-Type property of the request header is automatically defined and cannot be customized. If you add a custom Content-Type value in the Parameters table, the request will fail.
The HTTP Authorization request header is defined based on how you configured the selected Data source connection, as explained in the "Authentication" paragraph: although you can send authentication credentials as a parameter, you shouldn't need to.
If the API method request is set to POST, PUT or PATCH, you can also configure a payload generated by a Layout definition that will be included in the request body.
To do so, proceed as follows:
-
Click the “ADD LAYOUT” button to open the Layout editor. The Layout editor works exactly like the one implemented for the "Export Dataset" step and has the same constraints
-
Configure a Layout to define the data that will be sent
-
Replace the placeholder in the "Parameter name" column with a custom name (optional). The "parameter name" value is required and must be unique within the table
Once the Layout query is defined, an "EDIT LAYOUT" button will appear in the table. Click the "DETAILS" toggle to enable the "Extract zeroes" option to include zero values for selected Entities in the payload.
Please note that you cannot add multiple Blocks with the same heading to the same Layout definition. If you do so, an error message will appear during output configuration.
You can enable the "Extract zeroes" option only on the most nested Entity (of each Relationship tree) set By Row. This option works just like the Dataflow "extend" option for the calculation domain introduced in Board 11.
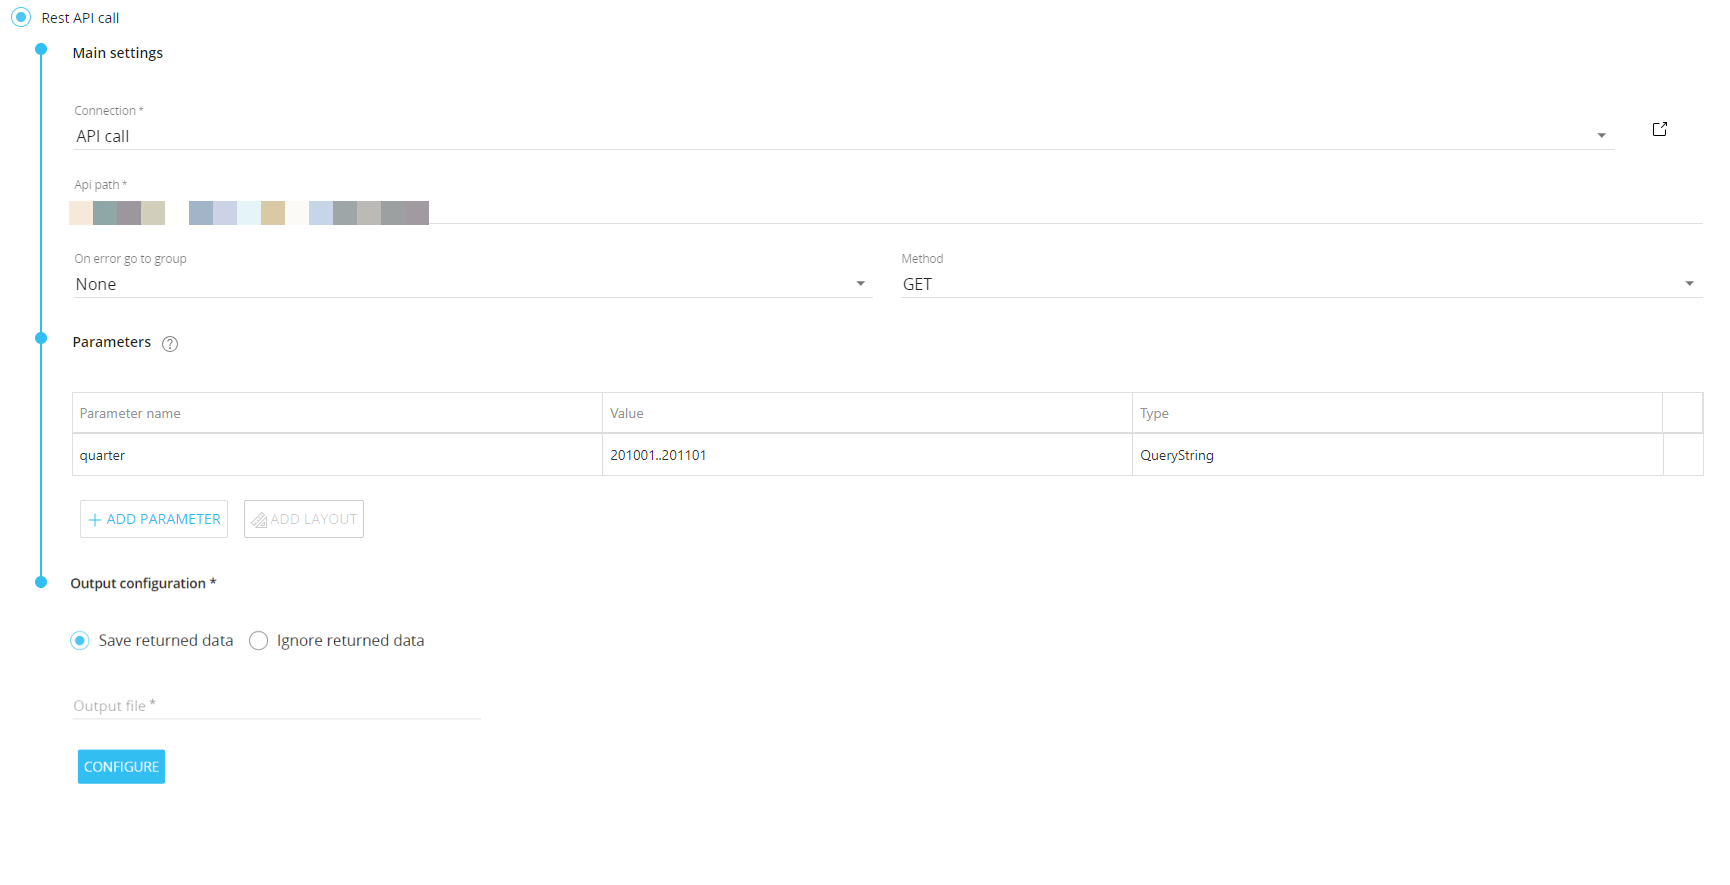
Support of the @Selection_Ex substitution formula and the Data Picker in the "Value" field
The "Value" field in each parameter row now supports the @Selection_Ex substitution formula to pass the currently active Selection to the API request as a parameter value, to overcome limitations of the @[entityname] and @selection formulas in terms of format customization.
As with every other Procedure step, the range or scope of execution on the Entities is inherited from the Select and the Pager selections of the Screen from which the Procedure is launched. These inherited selections will be combined with the contextual Procedure selections.
Compared to the use of the @Selection_Ex in Layouts and Screens, the implementation of this formula in the REST API call step differs in the following points:
- The "Layout" and "Block" parameters are not supported
- The Entity parameter is required
- The result of an @Selection_Ex resolved in the REST API call step context is similar to what happens in a Screen with the "ShowActive" parameter set to "True" (in this step, this parameter is not supported)
- The "Limit", "Display", and "Interval" parameters are supported
- The new "Separator" parameter can be used to define a custom separator string for the resulting Entity member list. If it is not defined, the comma separator will be used.
Example:

- If all members are selected, the output list will include all members separated by the separator string
- If no members are selected, the output list will be an empty string
Example
If the contextual selection of a Procedure includes the "2021", "2022", and "2023" members of the Entity "Year", you could configure the @Selection_Ex as in the image below:

With this configuration, the API request would look like this:
https://fakeapi.com/data?year=2021,2022,2023
The "Value" field in each parameter row now also supports the Data Picker function to extract data from a Cube or a Temporary Cube with a custom selection (optional) and pass those values to the API request as a parameter value.
The Data Picker is evaluated at runtime considering the context of the Procedure for the active selection. If a custom selection is specified in the Data Picker syntax, it will be considered for the evaluation at runtime, ignoring the context-inherited selection for the referenced relationship tree.
Compared to the use of the Data Picker in Layouts and Screens, the implementation of this function in the REST API call step differs in the following points:
- No formulas are supported in the Data Picker syntax
- You cannot specify a Data model other than the one where the Procedure resides
- If the referenced Cube cannot be found, the step will fail
If the Cube name, Entity name, or member code include a system-reserved character and an error is returned, enclose the string in double quotes to solve the parsing problem
Support of Substitution formulas and Data Pickers in the "API path" and "Parameter name" fields
The "API path" and "Parameter name" fields now support Substitution Formulas and Data Pickers, thus allowing more flexibility in the configuration of the step.
In the "API path" you can enter Substitution Formulas and Data Pickers as a part of the URL path. These elements are evaluated at runtime.
Example:
You can also enter Substitution Formulas and Data Pickers in the "Parameter name" field of each parameter in the "Parameters" table. These elements are also evaluated at runtime.
Example:
Pagination parameter
A new parameter can be added to the step configuration to handle pagination of returned data. Pagination is essential when dealing with very large data-sets, as it divides returned data into smaller chunks to serve the user and not overload network traffic.
To add pagination parameters to the request, click on the "PAGINATION" button to add a new row in the table. The new row includes the "Parameter name" field, three new fields specific to pagination in the "Value column, and the "Type" field.
The three new fields are the following:
- Value (required). Depending on the method supported by the endpoint you are calling, this field tells the server the number of items that should be skipped, the first page to consider, or the first record to consider
- Increment (required). Depending on the method supported by the endpoint you are calling, this field tells the server the number of items that should be returned, the increment of the page number based on the value of the previous response, or the increment of the record number based on the value of the previous response
- Stop after (optional). This field lets you define the maximum value for the parameter. When that limit is reached, the paginated calls will stop
All three fields support only integers and Data pickers that are evaluated at runtime: if the result is not an integer, the step will fail.
The "stop after" field can also be left blank.
The paginated calls will stop as soon as the "stop after" value is reached or the remote servers send a response with no records or an error response. If multiple "stop after" values have been set in multiple rows of the parameters table, the paginated calls will stop as soon as the first "stop after" value is reached.
In the case of the "Show dialog" output configuration, paginated calls will stop when the maximum number of rows that can be displayed is reached.
The received data chunks are always merged together according to the output configuration setting.
In the "TEST CALL" dialog, only the first chunk of data will be considered and displayed.
Examples
1) Method: page number
Configuration:

Requests:
https://fakeapi.com/data?Page=1&PerPage=80
https://fakeapi.com/data?Page=2&PerPage=80
etc.
2) Method: limit/offset
Configuration:

Requests:
https://fakeapi.com/data?Page=1
https://fakeapi.com/data?Page=81
etc.
3) Method: start/end
Configuration:

Requests:
https://fakeapi.com/data?Start=1&End=80
https://fakeapi.com/data?Start=81&End=160
etc.
Output configuration
Response with payload
If the request is successful and the response includes a payload (data received) that you want to import in Board, select "Save returned data", enter the output file path (optional) and name, and click the "CONFIGURE" button to continue.
In the output configuration dialog, you can configure a custom selection that will be applied to Layouts sent as parameters of the call. When done, click the "NEXT" button to submit the API request.
This step supports only data received in JSON format in the response body. See supported response types for more details.
During the output configuration, results of substitution formulas entered as parameters will consider the current context in terms of user, selection, date, etc. If you need to configure the call with specific parameter values, first enter them as fixed values in the "Parameters" table, then begin the output configuration process as described at the beginning of this section.
The request timeout for the API request is 100 seconds.
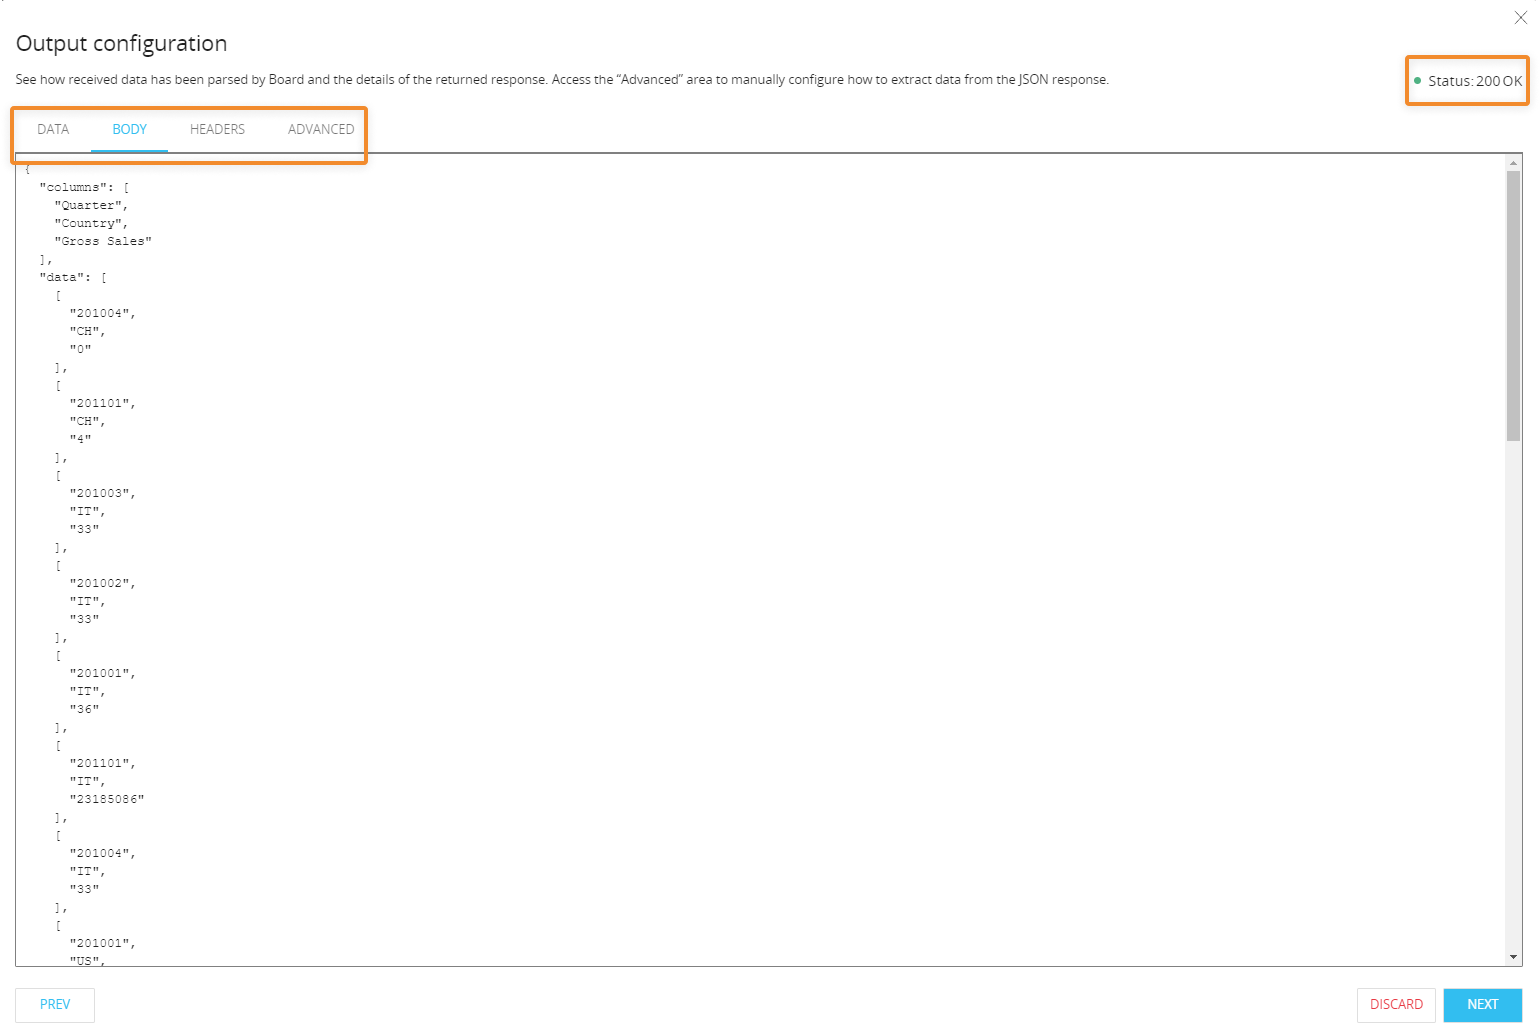
If the payload (data received) conforms to a supported JSON structure, a sample of 100 rows will be displayed in the form of a flat data table in the "Data" area.
A tabbed menu allows you to check the details of the returned response (the HTTP response status code in the top right corner, and the response header and body) and to access the “Advanced” area to manually configure how to extract data from the JSON response.
JSON responses sent from Api queries created in the "API queries" section of a Board Data model are automatically parsed and converted to a flat data table, considering all fields included in the JSON response body. If you want to parse only certain fields of the JSON response body, you can use the manual configuration options available in the “Advanced” area, as described below.
"Show dialog" option
If the request is successful and the response includes a payload (data received) that you want to display in Board, select the new "Show dialog" option. This option works much like the drill-through and will show the data received from the remote server in a dialog.
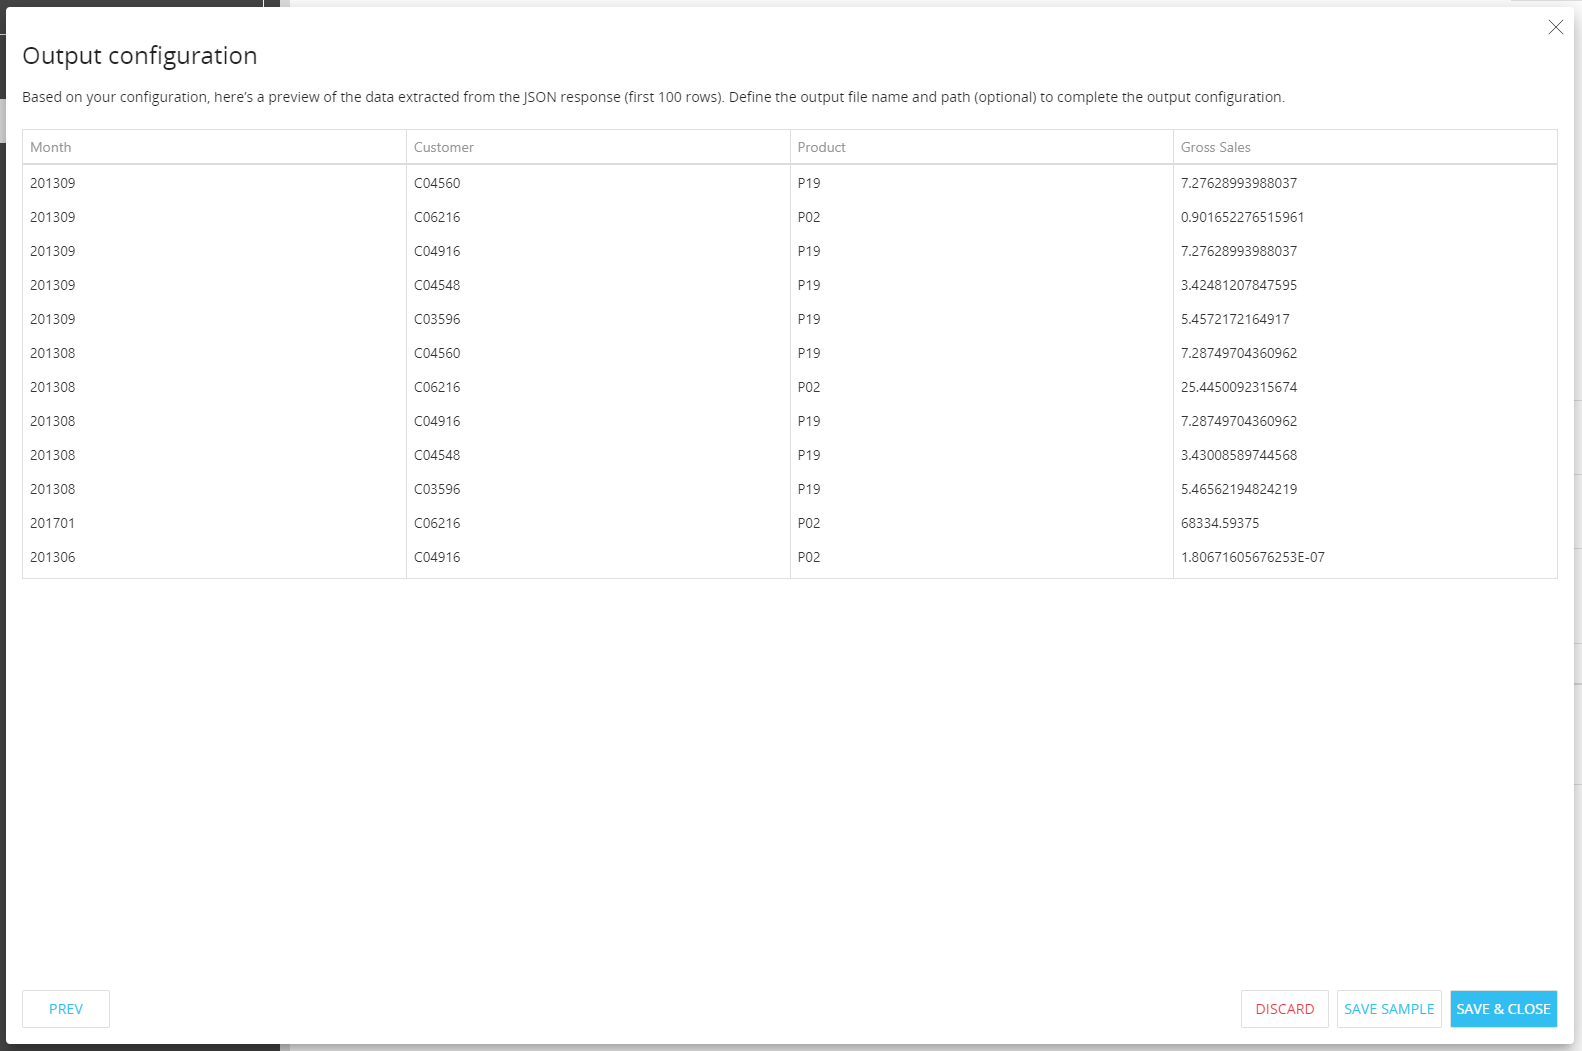
The configuration of this output option is similar to the configuration of the "Save returned data" option and can be accessed by clicking the "TEST CALL" button: at the last step of the configuration process, the Maker will be presented with a preview (first 100 rows) of the extracted data.
The ”SAVE SAMPLE” button allows to save the data returned (first 100 rows of the actual data) to a .csv file.
In Play mode, the dialog will display the full set of returned data. The user will be able to download the data displayed in the dialog by clicking the "EXPORT TO EXCEL" button at the bottom of the table.

CONFIGURE/TEST CALL dialog enhancements
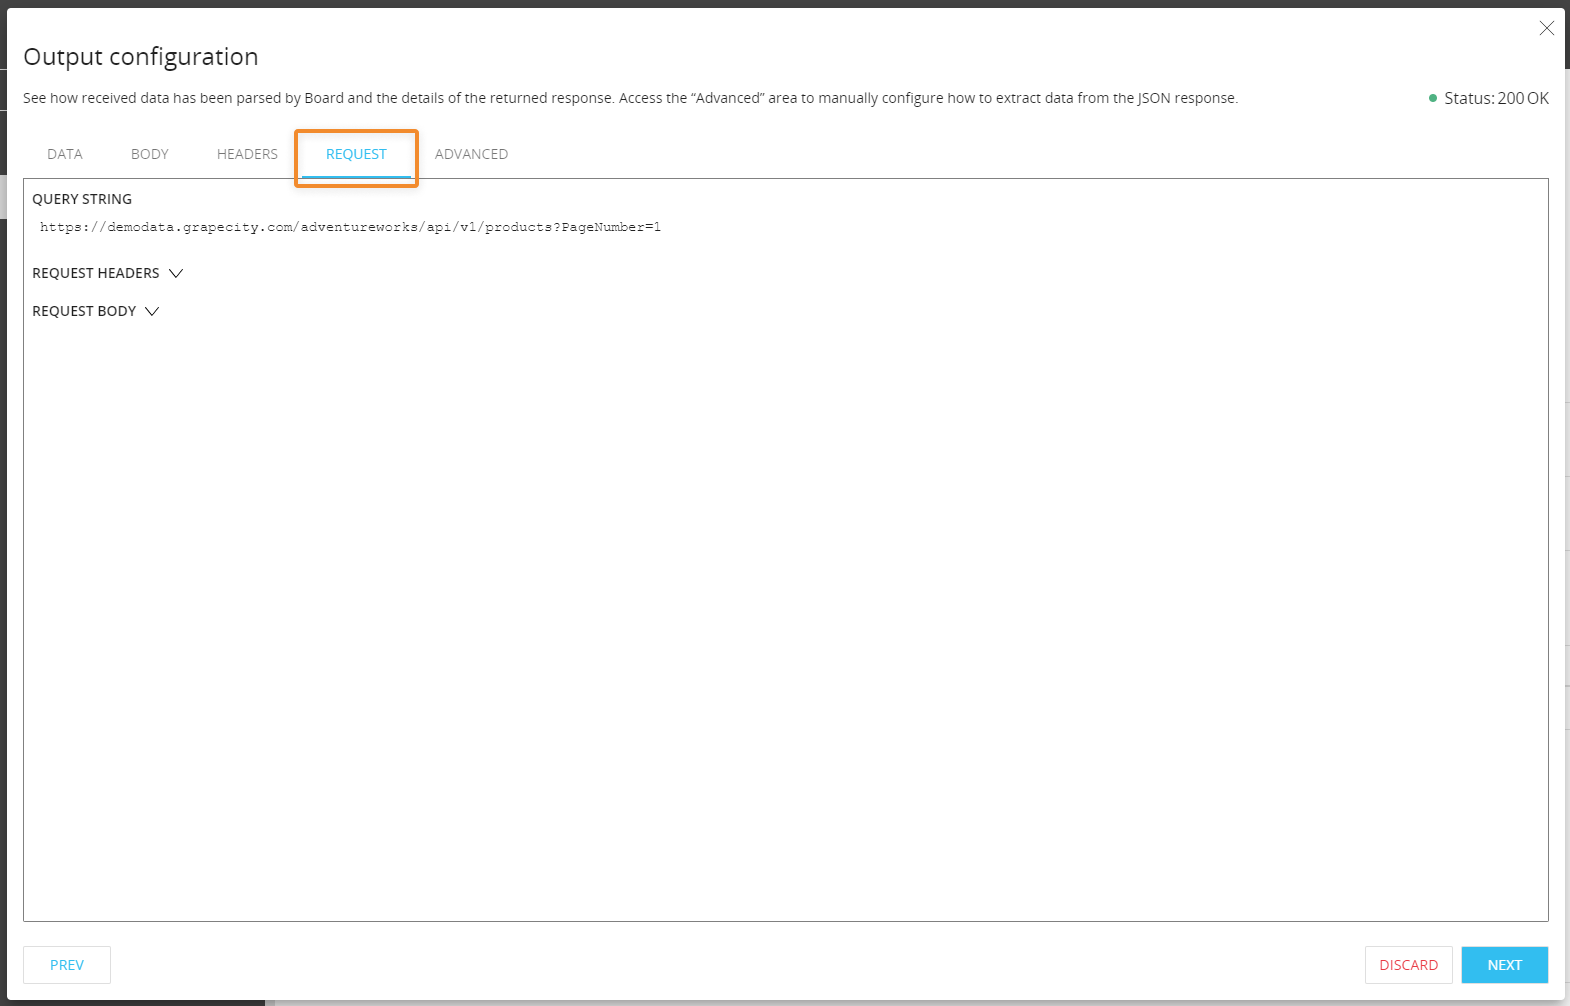
The CONFIGURE/TEST CALL dialog that opens when you click on the corresponding button under "Output configuration" (If the "Save returned data" or the "Ignore returned data" option is selected) has been improved with more information about the API request. This is particularly useful for debugging purposes.
After submitting the API request in the dialog, the tabbed menu in the dialog now includes a new "REQUEST" item. Click on it to review all details about the API request that has been sent (URL, Headers and Body).
In the "Advanced" area, you can define a root element path and/or configure the JSON fields that need to be parsed using JSONPath expressions:
- If you enter a root element path, Board will treat the defined element as the root element of the JSON structure. The root element path must be entered using the correct JSONPath expression with the dot-notation or the bracket-notation: in the parsing process, Board will consider inner or outer elements with respect to the root element based on the JSONPath expression entered.
If the desired root element is a field which contains the "." (dot) or whitespace character, the expression should be entered using the bracket-notation. Example: ['earnings.today']
The "~" (tilde) operator is not supported by the "Root path" field. - If you want to to have Board parse multiple specific JSON fields, proceed as follows:
- Click the "+" icon in the “Multiple JSON element mapping” area
- Enter the header title for the flat data table column
- Enter the JSONPath expression that defines the specific field that should be mapped to the corresponding header.
Expressions pointing to fields which contain the "." (dot) or whitespace character should be entered using the bracket-notation. Example: sales.['earnings.today']
Expressions pointing to non existing fields of the JSON structure are ignored, but the system does not consider this as an error since these fields may exist at a later time.
Only expressions pointing to fields that generate a single column are supported. Expressions pointing to unsupported data structures (arrays with sub-arrays, arrays of objects, etc.) will generate an error.
If a root element path has been defined, expressions must be written considering the position of the custom root element in the data structure of the JSON document.
You can use the "~" (tilde) operator at the end of an expression to parse the key and not its values.
Any change made in the "Advanced" area will immediately be reflected in the "Data" area: click the "Data" tab to see how Board will extract the data from the JSON document based on your manual settings, even the configuration is not complete.
If the configuration defined in the advanced area is no longer valid for any reason, the Procedure will go to the group selected in the "On error go to group" settings. If no group is selected in that setting, the Procedure will fail.
Once the mapping is finished, click "Next" to proceed to the last step of the output configuration, where you will be presented with a preview of the extracted data in a flat data table and the "Output file" field.
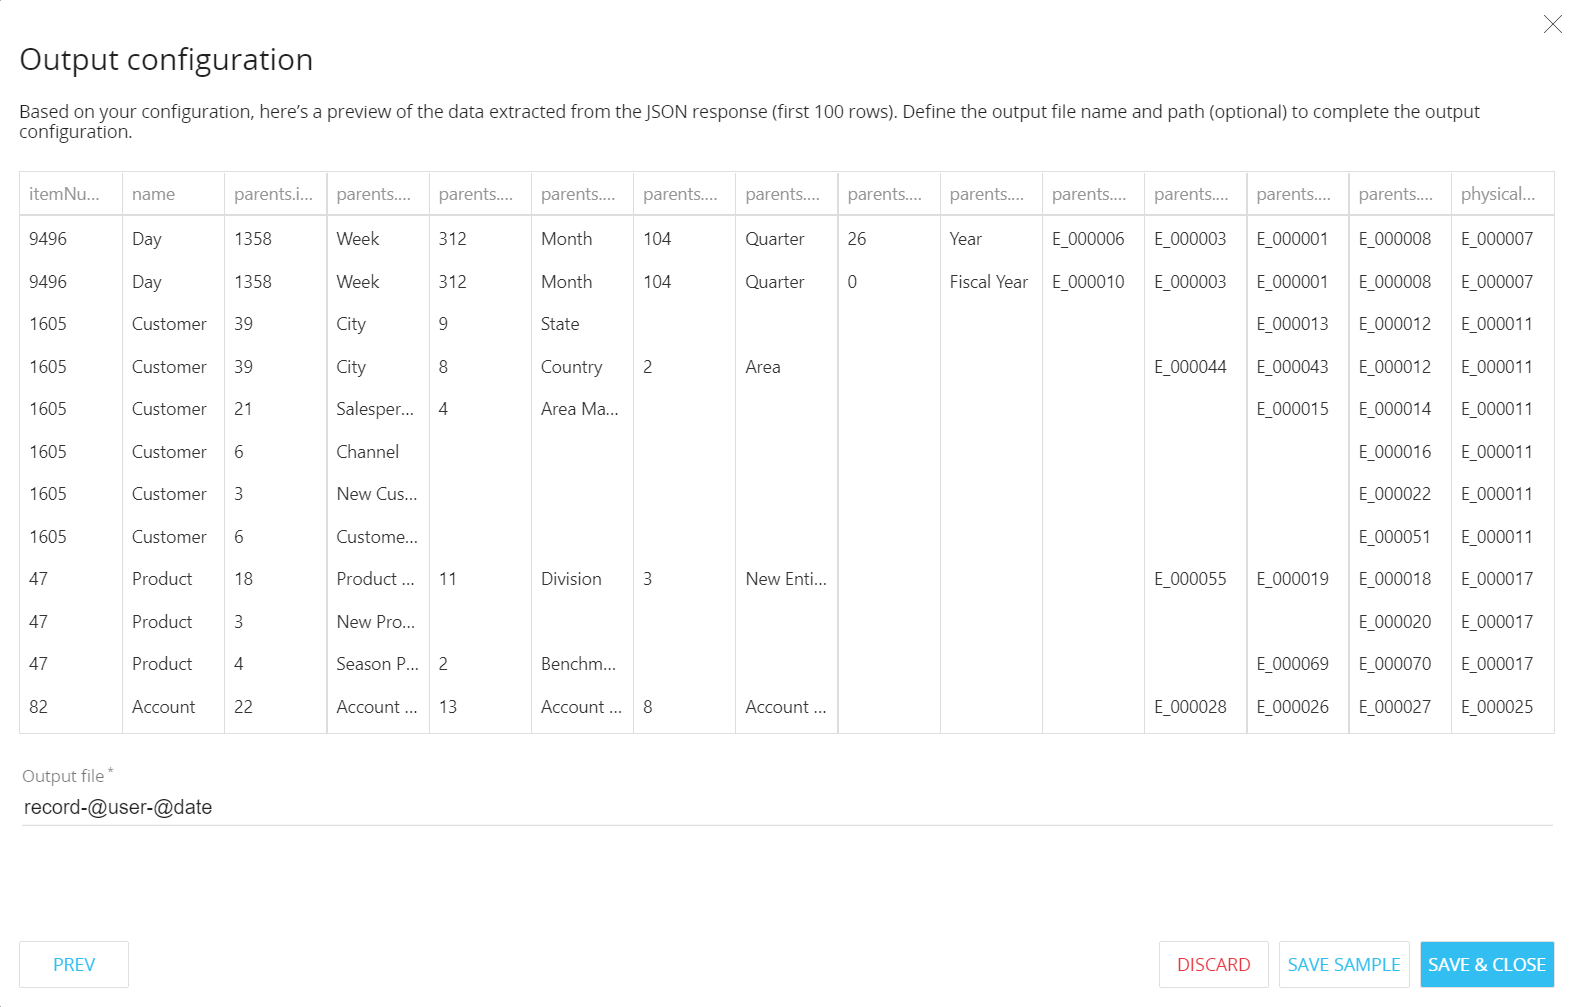
The "Output file" field indicates the path and name of the file where incoming data should be saved to. Incoming data is saved as a tab delimited text file (.csv).
The file cannot contain the TAB character, as it is used as a delimiter for each data field.
The field accepts only absolute paths or the file name, along with Substitution Formulas. Entering @user - @database in the field will generate, for example, a file named Maryprice - Budgeting.csv
The results of specific substitution formulas used in the "Output file" field are different from those obtained in Board due to character restrictions on filenames and folders.
In this case, the result of the following substitution formulas is always returned in the format shown below:
@DateTime → yyyy-MM-dd-hh-mm-ss
@DateMonth → yyyyMM
@Date → yyyy-MM-dd
@Time → hh-mm-ss
For @selection and @[entityname] formulas:
- The carriage return character is replaced by an hyphen "-"
- The colon ":" is replaced by the equal sign "="
- The slash character "/" is replaced by "of"
For on-premises environments: if only the filename value is entered, the file will be saved in the default path: [your-board-path]\Data model name\filename.csv
For cloud-based environments: if only the filename value is entered, the file will be saved in the default path: \Data model name\filename.csv. Cloud Customers can export the file to their shared storage area (z:\) by entering the desired path or by using the %bss% environment variable. If the path you entered doesn't exist, Board will automatically create non-existent directories on the shared storage area.
If no file name and no path are entered, Board will not save any file.
Numeric data in the response body will be saved as per the JSON standard (integer or floating point). The format can be changed using an ETL formula in the Data reader during the import process.
Dates in the response body will be saved as text strings in the csv file. The format can be changed using an ETL formula in the Data reader during the import process.
The "SAVE SAMPLE" button allows you to save the data displayed in the table to a file, following the configuration of the "Output file" field described in the previous paragraph. That file can be used to configure a Data reader which will be executed by a separate Procedure step in order to load the data received from the response into Board. See supported response types for more details.
Click the "SAVE & CLOSE" button to temporarily save the output configuration settings.
The settings saved in the output configuration process are saved permanently only when the entire Procedure step is saved.
As a consequence of the new step, a new option has been added to the "Text File Data reader" Procedure step: the new "Delete file after reading" flag allows you to delete the source text file after the execution of the Data reader.
Response with empty or useless payload or with no payload
If the request is successful, but you don't want to save the payload (received data) included in the response or the response does not have one, select "Ignore returned data".
Click the "TEST CALL" button that appears below to send a test request to the external API.
In the test call dialog, you can configure a custom selection that will be applied to Layouts sent as parameters of the call. Click the "NEXT" button to submit the API request.
After the request has been sent, the interface of the dialog changes in order to display the details of the returned response: the HTTP response status code is displayed in the top right corner, while the response header and body (if any) is shown in the main text area.
Click the "SAVE & CLOSE" button to temporarily save the custom selection sent with the API request.
The selection saved in the test call dialog is saved permanently only when the entire Procedure step is saved.
Results of substitution formulas entered as parameters will consider the current context in terms of user, selection, date, etc. If you need to test the call with specific parameter values, enter them as fixed values in the "Parameters" table.
The request timeout for the test call is 100 seconds.
Supported response types
The new step is capable of handling only data received in JSON format in the response body.
Only certain JSON data structures can be parsed automatically: if you want to parse only certain parts of a JSON structure, you can use the manual configuration options available in the "Advanced" area, as long as the manually selected data structures are supported.
The following JSON data structures are supported and automatically parsed as described below:
- If the JSON document includes only primitive values (strings, numbers, booleans, and null), it is converted to a single column table, as shown below.
"John"
↓Values John - If the JSON document includes primitive values wrapped in an object, it is converted to a multi-column table where each column represents a field. The columns are sorted in alphabetical order, as shown below.
{
"status": "success",
"result": 1000.0
}
↓Status Result success 1000 - If the JSON document includes primitive values in an array structure, it is converted to a single column table with a row for each valid value, as shown below.
[
1.0,
2.52
]
↓Values 1 2.52 - If the JSON document includes objects in an array structure, it is converted to a multi-column table where each column represents a field included in at least one object. The columns are sorted in alphabetical order and each row of the table represents a valid value of the array, as shown below.
[
{
"Day": "20210101",
"Customer": "C300",
"Product": "P300",
"Sales": 1.0
},
{
"Day": "20210102",
"Customer": "C300",
"Product": "P300",
"Revenues": 3.0
},
{
"Day": "20210103",
"Customer": "C300",
"Product": "P300",
"Sales": 20.0,
"Revenues": 10.0
}
]
↓Customer Day Product Revenues Sales C300 20210101 P300 1 C300 20210102 P300 3. C300 20210103 P300 10 20 - If the JSON document includes objects nested inside other objects, it is converted to a multi-column table where each column represents a field included in at least one object.
Headers of columns representing objects nested inside other objects are generated with a special notation where the first value is the uppermost parent key of the JSON node, and the second and subsequent values are other keys down to the most nested object. Each value is separated by a "." (dot) character.
Structures such as parent → child → child are flattened as parent.child.child.
In the following example, the header for the "address" key is obtained by concatenating the first parent key of the JSON node ("properties") with the child key ("server") that is also the parent key of "address", using a dot as separator:
"properties": {
"server": {
"address": "localhost",
"port": 1000
}
}
↓
header = properties.server.address (bold added)
The following JSON document is converted as shown below.
{
"count": 100,
"executionTime": "01:01",
"user": {
"name": "luke",
"role": "power"
},
"properties": {
"server": {
"address": "localhost",
"port": 1000
}
}
}
↓count executionTime properties.server.address properties.server.port user.name user.role 100 1:01:00 AM localhost 1000 luke power - If the JSON document includes arrays of objects with values in one or more array structures, it is converted to a multi-column table where each column represents a field included in at least one object. The columns are sorted in alphabetical order and each row of the table represents a combination of the values in each array with values in other fields (or arrays) in the object, as shown below.
[
{
"Day": "20210101",
"Customer": "C300",
"Product": "P300",
"Sales": [
{
"amount": 100.0,
"currency": "EUR"
},
{
"amount": 150.0,
"currency": "USD"
}
]
},
{
"Day": "20210102",
"Customer": "C300",
"Product": "P300",
"Sales": [
{
"amount": 200.0,
"currency": "EUR"
},
{
"amount": 250.0,
"currency": "USD"
}
]
}
]
↓Customer Day Product Sales.amount sales.currency C300 20210101 P300 100 EUR C300 20210101 P300 150 USD C300 20210102 P300 200 EUR C300 20210102 P300 250 USD
Since arrays can include primitive values, objects and arrays, the first valid item in the JSON data structure defines how data will be converted based on the rules described above. If the following items do not meet the first rule applied, they will be discarded as Board parses the entire JSON document.
JSON responses sent from Api queries created in the "API queries" section of a Board Data model are automatically parsed and converted to a flat data table, considering all fields included in the JSON response body. If you want to parse only certain fields of the JSON response body, you can use the manual configuration options available in the “Advanced” area.
Boolean values are written in the file as "0" (false) and "1" (true).

Null values are written in the file as they are read, as in the example below:

After the decimal point, zeros after non-zero digits are always removed during the flattening process.
Example:
"result": 1000.42560 → 1000.4256
The step does not support arrays with sub-arrays, as in the example shown below.

If, based on the previous rules, no valid values are found in the JSON, the Procedure will fail and a parsing error notification message will be displayed.
The step is not capable of automatically reading data in chunks: in case the external system provides chunked responses, you will need to set up multiple Procedure steps to receive all data.
Useful resources: