Board Client offers three options to print the content of a Board Screen:
Print the screen: prints all the objects in the Board screen
Hard copy Print: prints the screen the same way as is displayed
Print one single object: prints a single Board object contained in the screen
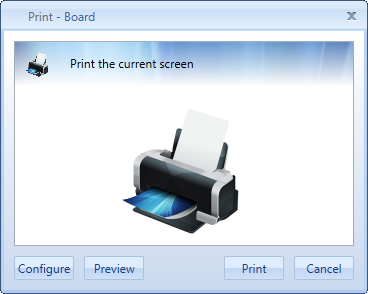
In order to print the entire content of a screen, please select from the Board Button the option Print -> Print the screen, otherwise press Ctlr+P :the following window will be shown
Starting from this window you can perform three actions:
Configure the report that you want to print
Have a print preview
Print the report
The preparation of the report that has to be printed passes through this window, that allows to set up the printing session as required.
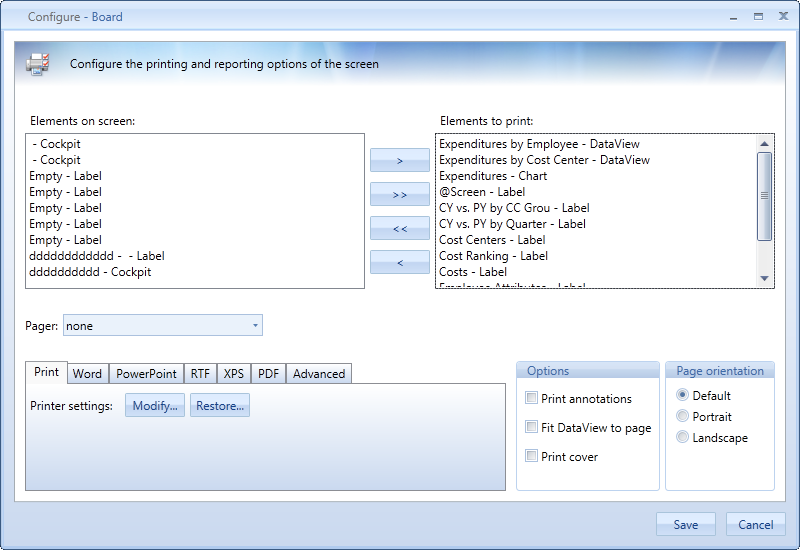
As shown in the picture, the window is divided in three main parts:
Elements to print: it shows two lists, on the left the printable objects in the screen, on the right elements you actually want to print.
Pager: if you want to print the screen retrieving data following a pager, please select one from the drop down. It’s possible to print only with a set up pager per time.
Settings configuration:for any specific export or printing activity. We’ll speak about this later in the chapter.
Print. Allows to set up the printer to be used for the current printing session or restore the default settings.
Word. Three options can be configured for the Microsoft Word export:
Filename: specify the exit path of the generated file.
Template: allows setting up a Word template to be used in the Word document creation.
Automatically Print: if flagged, the document will be printed on the default printer at the end of the creation.
PowerPoint. Two options can be configured for the Microsoft PowerPoint export:
Filename: specify the exit path of the generated file.
Template: allows setting up a PowerPoint template to be used in the PowerPoint presentation creation.
RTF, XPS e PDF: specify the exit path of the generated file.
Advanced. In this tab it’s possible to configure the print margins (Left, Right, Top e Bottom) and the print resolution.
Margin Setup
To set margins, open the Print configuration panel and go to the Advanced tab as shown.
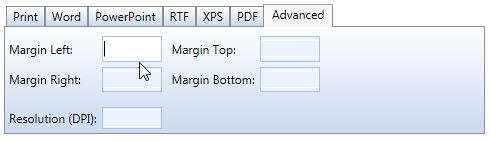
Print Resolution
When printing large objects the default value is 600 DPI. In case large objects are being printed the system will initially attempt printing with the given DPI resolution and eventually fall back to 96 DPI in case of failure.
Note:
In all configurations of a path, for example the Export actions or in Datareader actions, it is possible to use Windows environment variables (i.e. "%userprofile%\desktop\document.docx"). The environment variable is resolved by the Board Client or the Board Server, depending on which party is executing the action. Datareaders and Extracts are executed by the Board Server, but exports of objects, printing and broadcasting are executed by the BoardClient.
Options Pane. This pane allows you to choose whether to use three printing options:
Print annotations: chooses whether printing the screen and the Board Objects’ print annotations.
Fit DataView to Page: automatically adjusts the zooming level of a DataView so that the table prints to a single page.
Print cover: allows to print the first page of the report containing the screen name.
Page orientation. Here you can choose which orientation you will use in the printing session: horizontal, vertical or printer default.
Note:
Print configuration section is shared between prints and exports. For this reason changes made in this window are saved and used in every print session or export.
The Print preview allows the user to have a view of the report before sending it physically to the printer. It’s useful to check that the print will appear as desired.
Note:
For performance reasons, print preview is limited to a max of 20 pages.
When we are finally ready, just click on print to send the print request to the printer.
A further print option that you can find in the Board Button is the Hard Copy Print
Hard Copy prints the current screen in a single page, by printing a hard copy of the capsule screen. The objects are print in the position they appear on screen, note however that tables with several rows and columns are truncated as they appear (only the visible rows and columns are captured).
Note:
The Hard Copy Print uses a Mask eventually associated to the screen, printing exactly what you see on your monitor.
It’s possible to print a single board object contained in a screen simply clicking, in its own context menu, on the print function.
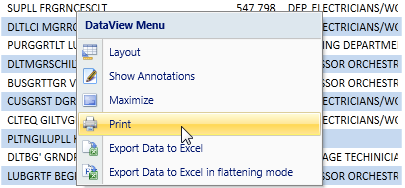
The Board Object will be directly printed (without passing through any configuration window) in the default printer.
It’s useful to remember that you can launch a print inside a procedure, as shown in the Reporting chapter.