The DataView object provides the following interactive features,
Sorting on columns
Pop-up chart
Drill-down
Master
Drill-to screen
Drill-procedure
Data-entry
Sliding Toolbar
To sort the rows of a DataView click on the header of the column to base the sort on.

The pop-up chart is a quick chart that appears when the mouse is placed over an entity item in rows.

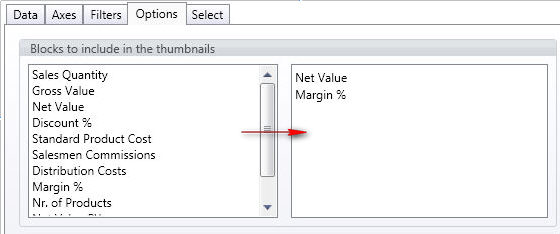
To configure a pop-up chart, open the Layout of the DataView, and go to the Options tab and drag and drop the desired data blocks of the Layout to plot on the chart.

This feature is applicable only if the Layout has one entity in the By Column axis. Note that the chart drawn is a line chart in case the entity in columns is a time entity and a bar chart in all other cases.
To drill-down on a row, right-click or double-click on the icon appearing on the left of the desired row.

To configure a drill-down path, switch to edit mode and right-click on the drill icon, then select the entity to drill to from the Entity tab.

Note:
The drill-down window now remembers the size defined by the user.
it's possible for the capsule designer to limit the drill down paths selecting the entities the user can drill

Just flag "Limit drill down entities" into the drill down window in edit mode and select the entities you want to prompt to the end user.
Clicking on the master icon of a row (see picture below) will refresh the data displayed by all other objects of the screen, with a restriction to the item clicked.

To set the Master Layout option, open the settings menu and click the master option icon. When the Master option is enabled, the drill-down function is disabled.
Note:
If the DataView Layout is a Master Layout, the Drill Icon is left to the Master icon. It is possible to contemporary activate both functions.
It is possible to drill-down from one DataView row to another screen within the same Capsule: click on the icon appearing on the left of the desired row: the selected target screen will be opened with a selection on the item clicked. This feature allows to nest analysis in a more powerful way than the standard drill-down which fundamentally only changes the level of granularity of one report, in a drill-to screen navigation the data represented (values, indexes) and types of objects (charts, dashboards, grids) may vary as the user drills from a top level view to another screen, more detailed.

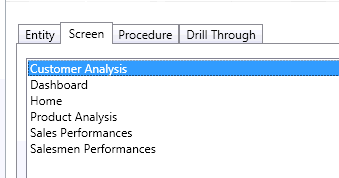
To configure a drill-down to another screen, switch to edit mode and right-click on the drill icon, then select the entity to drill to from the Screen tab.

It is possible to trigger a procedure from a row or a cell of a DataView; the procedure is launched with a selection filter on the item on the row (and column) clicked.
When a drill-procedure is configured, a procedure icon (see illustration below) appears next to the row item. Clicking on the icon opens a pop-up window which allows to selected the desired procedure from the list of configured ones.

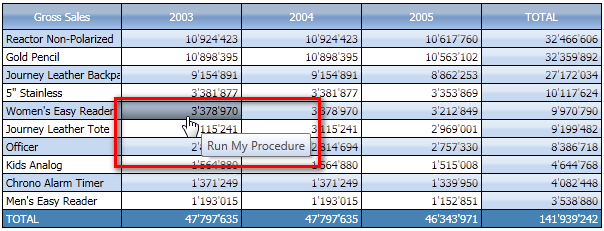
If the drill-procedure is configured on a cell (a block of the Layout), then the click-able cells appear as buttons when the mouse is placed over them. This option only supports selecting a single procedure.

To configure a drill-procedure, switch to edit mode and right-click on the drill icon, then select the procedures desired from the Procedure tab.

To configure a drill-procedure on a cell, switch to edit mode, open the Layout of the DataView, and go to the Options tab

then set the appearance property of the desired block to Button,
then click the Configure icon to set the actions (procedures) to launch when the cell is clicked.
A tooltip appears when the mouse pointer is placed over a button cell. In the following example, the cells have been configured to trigger a Procedure when clicked.

The DataView object supports entering numerical, dates and text data into Board cubes. Refer to The Layout object section of this manual for details.
When data-entry is enabled on a cube, the cells background becomes yellow (unless otherwise formatted). Click on a cell and type the desired value or text. On numerical cells, a calculator icon appears, allowing to use the calculator to enter the desired value.

After inserting the value press the green icon located at the top right of the DataView grid to actually save the values to the cube.
The red arrow icon (reset icon) allows to restore the last saved value, or otherwise said it resets unsaved changes.
The sliding tool-bar is prompted out clicking on the top left data-view corner, provides several user facilities. From the left to right :
> Save Icon : when clicked data are saved
> Undo Icon : when clicked data are restored if not saved yet
> Lock Icon : locking mechanism is activated on selected cells
> un-Lock Icon : locking mechanism is deactivated on selected cells
> plus icon : dataview break down levels are expanded
> minus icon : dataview break down levels are collapsed

> fx icon : Nexel formulas editor is prompted out
> print icon : print execution window is prompted out
> XLS icon : data-view data are exported in MS Excel Worksheet
> Cart icon : data-view is exported in the Cart design desk
> edit icon : layout configuration panel is prompted out
Fast Search is available in the Data-view Siding Bar

An end-user can easily locate information within the grid via the built-in Search Panel. At runtime, it can be invoked by pressing the CTRL+F shortcut. The built-in Search Panel provides an easy way of searching against multiple columns.
Type the string you would like to search in the Report. The Items matching your Search will be highlighted as following.
To reset the Search delete all the Search chars or press ESC.


The bullet list below lists the main properties affecting element behavior and appearance.
· It is not necessary to quote the search string
· the search string is yellow highlighted on all the grid items that even partially matches the string
· the report is automatically filtered on those rows with at least one element that matches the string
· the search is not “exact” type but it selects items even partially matching
· multiple strings criteria can be created spacing strings
· the search string can even match number or date but always as a text string search (separator must be typed)
· the search happens on the grid elements only : if report visualization option are Desc based, search on Item codes doesn’t work
· the search can be executed even typing one single char if double byte
· returned members cut-off is 2K
The quick Search (Ctrl+F) is available in the Drill Down Window too.