Adding and managing Permission Groups
- Applies to: all Board Cloud subscriptions using Board version 12.6 (2023 Summer Release) or newer
HOW: Creating a new Permission Group
The configuration of each Permission Group is similar to the configuration of a single user in the Subscription Hub: in the Group configuration panel, you can assign roles and access permissions in a granular way for each Board Platform, as well as assign Subscription Hub administrative authorizations and define specific metadata values.
All these configurations will be automatically applied to users added to the Group.
You can also set a default Permission Group: in this case, the configurations and properties defined in that Permission Group will automatically apply to all new users created in the Subscription Hub from that point on.
To create a new Permission Group:
- Click on "+PERMISSION GROUP" to bring up the Group configuration panel and fill in the name field (required)
- Fill in all relevant Group metadata fields (optional)
If Permission Groups are to be used with the Board SCIM API service, all metadata corresponding to the user and group attributes used in the APIs requests must already be created. This is done in the User Metadata section of the Subscription Hub, where you must map the metadata fields to the corresponding SCIM attributes with the "SCIM attribute" drop-down list.
-
From the License drop-down menu, assign a Board license (optional)
-
From the Authentication type drop-down menu, select the desired authentication type that will be assigned to users in the Group (optional).
The "disabled" checkbox works just as it does in the User profile panel: if the checkbox is selected, the users will not have access to Board. When a Group is disabled, its licenses are immediately available to assign to other user accounts.
If a Group is not disabled, but one of its users is, that users will not be able to access Board. In the case of users assigned to Permission Groups, access to Board is only granted if those users and their Group are not disabled. -
Switch on the toggle next to "Platform authorization" if you want to automatically allow users in the Group to access certain Platforms (optional). The options available in the table are the same as in the User profile panel: see the Users section for more details
-
Switch on the toggle next to "Subscription hub authorizations" if you want to automatically grant or deny access to specific sections of the Subscription Hub to other Administrators (optional). The options available in the table are the same as in the User profile panel: see the Users section for more details
-
Click the “SAVE” button in the bottom right corner of the page to create the Permission Group.
You can assign a Permission Group to the user either via a SCIM request of by manually selecting the Permission Group from the "Permission Group" drop-down menu in the User profile panel.
Managing Permission Groups
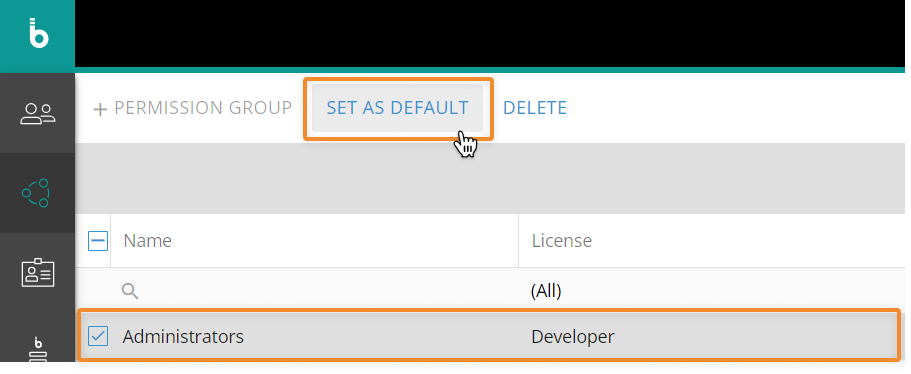
To set a Permission Group as default, select it in the table and click the "SET AS DEFAULT" button that appears on top of the table:

To remove a Permission Group default, select it in the table and click the "REMOVE DEFAULT" button that appears on top of the table, or define a new default Permission Group.
There can only be one Permission Group set as default.
If a user is created via a SCIM request and no default Permission Group is set in the Subscription Hub (or the default Permission Group is disabled), the account will be created with the "Board authentication" authentication type, but the email needed to verify the associated email address and set a password will not be sent automatically (as is the case for manually created users).
The email needed to verify the associated email address and set a password is sent automatically when:
- Users are added to a Permission Group which is not disabled and has the authentication type set to "Board authentication". This is also the case for default Permission Groups
- The authentication type of a user or a non-empty Permission Group is changed from any setting to "Board authentication".
To edit one or more Groups, select them and modify the desired options as explained in the previous paragraph.
Any change made to a Group is immediately applied to all its users, except for the "Default" property: once it has been modified, the configurations and properties defined in the new default Group will be applied only to new users created in the Subscription Hub from that point on.
To delete one or more Groups, select them then click the "DELETE" button in the upper left corner of the page and then click "yes" in the confirmation pop up
When you delete a Permission Group that has users assigned to it, those users will not be automatically assigned to another Group and will lose all configurations and properties inherited from the Group.
In this case, configurations and properties set at the user level before it was added to the Group will be restored.